8TH of May 6 Card kit
I was a week early last week, saying that it was mothers day
last weekend. Well its this weekend so I will say again HAPPY MOTHERS DAY
LADIES. And I hope you have a lovely wonderful weekend.
Card one – Spread Joy, not Germs
Just a fun, isolation card. Easy to assemble.
Pop the yellow card on. Using pop dots pop up the mounted hand sanitiser
stamped image.
and the #quarantinelife tag using your spare smaller square pop dots.
Use the bling to embellish
Card two – Bright Happy birthday
Place the orange card onto the card base. Rip your blue piece
to a 1cm size (with rips on both sides) Blue piece is already ripped. Place these
onto the card as per the picture.
Colour in your stamped image and the balloon spots n strings. Use pop dots to pop
up the balloons and position them so that the strings go around the Happy
birthday. Glue the ends of the strings down just to hold them and trim off any
excess over hand. Then place onto the yellow piece which will then be pop
dotted onto the card background. Use your glitter pen to glitter up your balloons
if you like.
Card three – Wild and free congrats
This is using a new stamp set for this month. So simple and
effective. Place the black onto the card, then on the arrow piece, turn it over
and put some tape along the side. then place side by side onto the green pieces,
about 1cm wide. That gets stuck straight down onto the black.
Pop the congrats onto the dark aqua then pop dot that up onto the card. There is
a green and white decorated strip, this is under the line of bling. Stick the
wild and free bear image straight down flat underneath that. The bling strip is
already stuck together, so easy for you. Then the single bling can go where you
like.
Start by distressing around the embossed white piece. (I use
the side of my scissors and just scrape around the edge to bend and rip it
slightly) Stick this piece down.
stick the saying to the yellow card strip then stick down to the card. Just up
from the bottom.
using a Pen, curl up the petals of the flowers and curl the leaves.
Stick the yellow flower directly to the card, the orange flower is pop dotted
on and the red is also pop dotted again on top of that. Leaves are just stuck
directly down, hidden under the petals.
Add the bling where you like.
A fun blue boys card. Start by sticking down the stars piece
of paper at the top then the navy card at the bottom. (this will overlap)
Layer up the saying on to the blue card, then onto the white. Sticking this directly
onto the card. Colour in the robot boy, in whatever colours you like (you don’t
have to colour him at all) Place this
directly onto the card leaving room for the framed piece.
Pop the thin pop dots on each side of the frame and position it over the top of
the stamped image. Not directly the same but opposite edging. IF that makes sense.
Using glue, stick down the cogs.
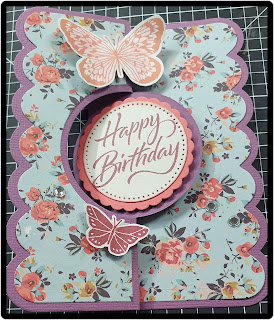
Card Six – Purple butterfly

This is a different card. First time for me making it as for
you as well.
It all pieces together pretty easy. Fold your card following the two photos above
as direction. And use a bone folder to
get a tight fold.
Now you have your folds set in, stick down the flowery accent papers to the
correct edges.
Stick the stamped Happy birthday onto the pink scalloped circle, then use pop
dots to pop onto the circle side that will face UP when folded closed. The
white scalloped piece goes on the opposite side of the circle, which will be
inside the card when folded closed.
Using a pencil, curl the wings of the butterfly’s, and stick a pop dot right in
the middle only, so that the wings can still fly free.
The folded card will fit into the card nicely.


No comments:
Post a Comment