Friday, May 29, 2020

Card classes 25th to 29th May 2020

CARD CLASS

Back to weekly card classes, at my home and in your home. 
These ones are for the week of 25th to the 29th Of May 

 Card One - Mens Birthday
a simple one, but being mens, its so hard to find anything themed men.  Dug this stamp set from my retired range.  Called You are the best, a fathers day themed set.

I have used a Kaiser cogs theme embossing folder for the blue piece. And Kmart rustic twine. The rest is CTMH.

Start by sticking down the embossed blue piece, giving you the space to tie down the twine. Now this piece can be stuck down to the card base.

Stamp out the square pieces and the greeting.
I used Espresso ink Stick the images onto the black base, and using foam dots pop them up in what ever order you like .  Then the Best wishes.
Pop your bling where you like. I used Black and White dots from CTHM.
Card 2 - Birthday Balloon
This card comes with a pack of numbers from 0 to 9. So you can pop on what ever number you like when its needed.  Ive chosen 13 as I have one coming up .
I have used CTMH set called Birthday Greetings
Start by sticking down the purple flower piece.
We will need to stamp the white piece first.
I used Wisteria ink, Starting with the birthday hello  , then randomly stamp the other images where you like. I used circle thin cuts to cut out the balloon shapes. You just need to make the balloon knot and string.
Using Foam tape, on the back of the white, put all around the edge and small pieces scattered around the circles.
I used a foam dot to pop up the extra circle for the number.
Using a shimmer brush I shimmered up the number for that extra Sparkle.

Card 3 - Happiness
I have used ctmh stamp set Blooming Friendship, I've been waiting for ages to use this one. This wont be the last time either.
I started with a retired paper (Regatta) Stamping at the bottom in Black ink before sticking it down to the card base.

Using the Rectangle stitched Dies  I cut out the middle size, and popped on askew.
Stamping onto white cardstock using black Stazon, the big flower.
I cut out using the Dies that I got with it, but are a optional purchase.  You can fussy cut these out.

Getting my arty on, I water coloured my flower.  (I used my CTMH Watercolour Paints )  I painted the flower fully in a lighter wateryer plum, then worked my way down. As the watercolour pallet starts to soak up the water it gets thicker and darker. I take advantage of this. (instead of the other way around, trying to go dark then light.. ) With the leaves, I made a green/brown in one of the mixer trays, to keep the dusty colour theme. )
I stuck the flower down with many pop dots, and then put on some gold bling.

Friday, May 22, 2020

6 Card Quarantine Kit - 22nd May 2020


Kay’s 6 card quarantine Kit

So it seems covid-19 restrictions are slowly coming down. Now we can have 5 people visit. So Card classes can resume. Those who are not local and have been getting card kits posted, I will be continuing to do this, as 6 card kits fortnightly. For the same price.  These will need to be pre ordered the two weeks in advance as they will be the card class kits I make up for the weekly kits.
Local ladies, who don’t usually come to my classes, this goes for you too, if you would like to continue with the 6 card kits, then it will be also fortnightly. Or we can arrange attendance my home classes.

Okay, here are the cards


Card One – Someone special butterfly
Who doesn’t love a sparkly card, this one certainly is that?  Start with taping down the two thin glitter strips, Leaving 3 inches from the edge in on both sides. On the white card stick down the pink spotty paper, sticking down the ribbon, letting it wrap around and stick on the back.  Pop tape on the back of the white card now that you have done that and stick it right between the two glitter strips. (there will be an overlap) stick the full butterfly onto your white space, and on your glitter butterfly put tape ONLY on the body of it. So that the wings can still be free to be rolled free) Stick your saying on your coloured mounted piece and then use pop dots to pop it up on the bottom of the card. Stick on the pearl bling.


Card two – Thanks a bunch
Using pencils, I coloured in the square-ish piece with the house. To assemble the card, stick down the Orange flowered piece, then stick on that the embossed white card.  Your piece should already have foam tape ready to peel.  Put tape directly on the back of the coloured piece and place in the same space hole in the white card.
use pop dots on the tag and place as per my example.  Then arrange your bling where you like.


Card Three – Thinking of you
This card isn’t to hard to assemble. Turn over the leafy strip and stick down the semi-circle strips on the edges so they stick out, then wrap the strong around and have it stick on the back, as per my example. Use more adhesive on the back and stick down in the middle of the card. Leaving the same amount of space at the top and bottom.
Stick down the greeting to the green card and pop dot it over the green string.  (there are two options of greetings to choose from) You can arrange the rest where ever you like, but I stuck directly down one bird just behind the greeting. The other is pop dotted on the other side. I did cut down the leaves and only used the top half shown.  I put my bling down the bottom.


Card four – Hello
This card is a side fold, there is a plain piece of white that needs to be stuck inside the card to be written on.
A lot of time went into this, how many butterflies to add, how many to pop up, what to fill the space with. You get blessed with the end product to replicate.  I hope you all love it as much as me. Its easy to assemble. I’ve done all the hard work. Start with sticking down the die cut HELLO. The butterflies have a half pop dot on their bodies. Using a pen slightly curl up the wings. Place them where you like, or as per my example.  Pop on your bling where you like.


Card five – Count your life by smiles (birthday)
Assemble this card from the bottom up. Start with the striped strip on the left side, stick down the square piece in a diamond shape in the middle. The brown strip will stick to the right of the card, overlapping the rest. The thin white inked strip will then be stuck down to break up the overlap. Stick down the greeting to the cream inked boarder piece, then use pop dots and place over the diamond piece leaving space for your flower.  Cut out your flower, I’ve sponge inked the middle, your free to leave it as it is or go over the lines with a co-ordinating colour.  I have pop dotted just the flower head but directly stuck down the flower stem. Place your bling where you like.


Card six – Friendship
A beautiful card to send to a friend far away.  Easy to assemble too.
Stick down the spotty embossed white card. Stick down the greeting to the purple square and then use your pop dots to stick it down to the card base.  (to achieve the look of the two tones on the flower I fully stamped the flower, stamped it off onto scrap paper, then reinked ONLY the flower bud. Stamping it down gave a two-tone look. I was able to then stamp the greeting over the top of the lighter inked stem) I have pre stuck your bow to your tassel, peel of the second backing and stick down where you like, as well as add your bling to the top.

Wednesday, May 13, 2020

6 Card Quarantine Kit - 13th May 2020


Card Kits – Friday the 13th

Well here is another week, how are you all going? Seems like the restrictions may be slowly lifting very soon.  I bet you are all keen to start socialising sooner rather then later.


Card one – Here’s a little message for you
I inked up the brick background using two different browns.  Just lightly swept over the top to give the dirty/distressed look. Then stick it down. (there is a tiny boarder around the edge) then when sticking down the brown boardered piece, its actually the same size as the card base. And last of all the glitter strip. (peel off the clear backing as its already sticky).
Using pop dots, pop up the typewriter and the pointing hand, position on to the card.


Card two – wishing you a happy everything
Stick down the stamped orange stamped card. Working your way up stick down the grey triangle piece. Before sticking the cream piece on we will assemble that.
stick down the orange small stamped rectangle, then wrap the yarn around using tape on the back to hold it down as you go. (I did slide the orange piece after if you do forget to do it first)
I pop dotted the stamped quote onto the grey and then pop dotted again to pop onto the card. Makes it pop out nicely.
The small piece of orange I made little ribbon ends, cut in almost half and slide up under the quote.
scatter the bling where you like 😊

Card three – Pirate Birthday

Stick down the stripy piece first. Then with the green spotty, rip off one of the sides and stick down the bottom to overlap the stripy piece. 
Colour in the pirate picture. I used pencil to give a shady/sandy look. Colour in heavier where there would be a shadow. Stick this piece down onto the green square big enough, and stick directly onto the card base. 
Pop on the birthday quote onto the smaller square (ink around the edges if you like too) and using pop dots pop it up onto the card to one side. 
Nice and easy one for you.


Card four – Thinking of you
Start with the base of your card.  Stick down the brown flowered piece down the bottom first. Then the little pieces of orange, pop them to the sides so that it looks like it goes right through, once you stick down your larger flowered piece on top. (this is to save papers 😊 )
Using a dark brown ink, stamp out your birds, two sizes of pine cones and in a lighter ink a tree branch. (on the white pieces provided) Fussy cut them out.
Stick down the quote onto the peach piece, using pop dots to pop that up at the bottom of the card.
Then stick the cut out pieces onto the rest of the card using pop dots and some flat to the card.
Pop the bling on at the end where ever you like.


Card five – Monochrome celebrate
Start by sticking down the stamped green strip to the side of the card. Then position the brown piece just over lapping, and then the thin stamped cream strip to one side of the brown.
Stick down the celebrate piece onto the green rectangle piece using pop dots to pop it up off the card. Positioned just over half way down.  Stick on the heart bling to this.
Cut out your butter fly, curling the wings to bring it out, and using a pop dot, pop up on your card, using my card as a guide.
Use your glitter pen to glitter up the butterflies for that pretty bling, and the rest of the bling at the end where ever you like.


Card six – With sympathy
Loving this vintage style card.
Start by inking around the edge of the stamped card using any brown you have. Really bring in the ink at the edges to complete that distressed/ old look.
Stick down this stamped card onto the card.
 Cut out the flowers and the bird. (if you need too) I only used pop dots for the flowers and stuck down the bird straight onto the card as it seemed too much around the word sympathy.
I also didn’t use bling as I feel like it didn’t need it, being the nature of the card.  Just simple and said all it needed too. But feel free to add some your own if you wanted.

Thanks for purchasing this week…. And helping out my little business… I really appreciate you all buying cards… keeping me sane and I hope its keeping you sane completing them..
Kay xo


Friday, May 8, 2020

6 Card Quarantine Kit - 8th of May 2020


8TH of May 6 Card kit

I was a week early last week, saying that it was mothers day last weekend. Well its this weekend so I will say again HAPPY MOTHERS DAY LADIES. And I hope you have a lovely wonderful weekend.


Card one – Spread Joy, not Germs
Just a fun, isolation card. Easy to assemble. 
Pop the yellow card on. Using pop dots pop up the mounted hand sanitiser stamped image. 
and the #quarantinelife tag using your spare smaller square pop dots.

Use the bling to embellish


Card two – Bright Happy birthday
Place the orange card onto the card base. Rip your blue piece to a 1cm size (with rips on both sides) Blue piece is already ripped. Place these onto the card as per the picture. 
Colour in your stamped image and the balloon spots n strings. Use pop dots to pop up the balloons and position them so that the strings go around the Happy birthday. Glue the ends of the strings down just to hold them and trim off any excess over hand. Then place onto the yellow piece which will then be pop dotted onto the card background. Use your glitter pen to glitter up your balloons if you like.


Card three – Wild and free congrats
This is using a new stamp set for this month. So simple and effective. Place the black onto the card, then on the arrow piece, turn it over and put some tape along the side. then place side by side onto the green pieces, about 1cm wide. That gets stuck straight down onto the black. 
Pop the congrats onto the dark aqua then pop dot that up onto the card. There is a green and white decorated strip, this is under the line of bling. Stick the wild and free bear image straight down flat underneath that. The bling strip is already stuck together, so easy for you. Then the single bling can go where you like.


Card Four – Yellow flower time to celebrate
Start by distressing around the embossed white piece. (I use the side of my scissors and just scrape around the edge to bend and rip it slightly) Stick this piece down. 
stick the saying to the yellow card strip then stick down to the card. Just up from the bottom. 
using a Pen, curl up the petals of the flowers and curl the leaves. 
Stick the yellow flower directly to the card, the orange flower is pop dotted on and the red is also pop dotted again on top of that. Leaves are just stuck directly down, hidden under the petals. 
Add the bling where you like.


Card five – Blue Gears birthday
A fun blue boys card. Start by sticking down the stars piece of paper at the top then the navy card at the bottom. (this will overlap)
Layer up the saying on to the blue card, then onto the white. Sticking this directly onto the card. Colour in the robot boy, in whatever colours you like (you don’t have to colour him at all)  Place this directly onto the card leaving room for the framed piece. 
Pop the thin pop dots on each side of the frame and position it over the top of the stamped image. Not directly the same but opposite edging. IF that makes sense. 
Using glue, stick down the cogs.


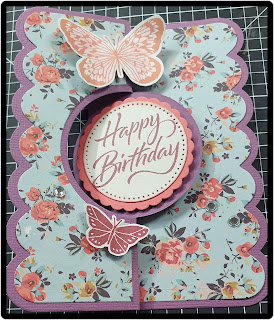
Card  Six – Purple butterfly

This is a different card. First time for me making it as for you as well. 
It all pieces together pretty easy. Fold your card following the two photos above as direction.  And use a bone folder to get a tight fold.
Now you have your folds set in, stick down the flowery accent papers to the correct edges. 
Stick the stamped Happy birthday onto the pink scalloped circle, then use pop dots to pop onto the circle side that will face UP when folded closed. The white scalloped piece goes on the opposite side of the circle, which will be inside the card when folded closed. 
Using a pencil, curl the wings of the butterfly’s, and stick a pop dot right in the middle only, so that the wings can still fly free. 
The folded card will fit into the card nicely.


Friday, May 1, 2020

6 Card Quarantine Kit - 1st of May 2020


1st of May 2020
6 Card Quarantine Kit
I hope you all had a lovely week, Mother’s Day this weekend. What ever you get up too, I hope you have a great day!
Here are this weeks Card assembly instructions.


Card one – Happy birthday Girl

Colour in your girl using what ever technique you like. I used alcohol markers.

To assemble, pop the spotty embossed piece onto the card base, using your sand paper, sand the spots to give them a white distressed look.

 Stick the saying onto the pink card and place close to the bottom of the card. 

Using the pop dots pop up your girl and place into the middle of the card.
Bling up where you like with the silver bling.


Card Two – Celebrate, it’s your birthday!

This card is quite simple.
Layer the pieces onto the card base, I started with the diamond piece, then the pink card. If you have any gap or overlap you will cover that with the dark pink thin piece.
Stick the sentiment onto the white card and use your pop dots to pop it off the card.
Cut out your extra candle and stars, using your spare small pop dots, pop them up where you like and then bling up at the end.


Card Three – Monster birthday

Super cute monster card, all die cut for you ready to assemble.
Assemble the blue card first onto the card base. Then the black card.
Using your pop dots pop up all the monsters and the sentiment onto your card.
Try it different ways, even turn the card and see how you like it.


Card four – Sailing Birthday

Ive done all the work for you on this one. I used watercolour pencils to colour in layers. (note the sun area up top, turned out amazing) Then used a wet paint brush to blend the pencil colours, starting with the water and stopping leaving that dark line to represent the horizon.

You only need to assemble the card starting with the yellow card, blue card and water coloured paper.
Popping on the bling at the end.


Card Five – Sweet flower birthday

Start with colouring your flower. I used alcohol markers. On the flower use a bit of shimmer pen. (I used silver) 

While it is drying, assemble the rest of the card.
Wrap the twine around the purple card at the bottom, having it tie at one side, knot it, and then add the tassel before tying into a bow.

Pop the stamped flower onto the winged tag and the sentiment onto its backing. Use pop dots to pop both up over the twine.


Card six – Kind heart butterfly

Brought a new butterfly Die, so had to use it with this one.
Love how it turned out.

Stick the flowered paper onto the purple card base.
Pop up the sentiment onto the card using your pop dots.  

Using glue, piece together the butterfly, then pop dot it up onto the card where ever you please.
Add your bling pearls 😊


Enjoy your week and HAPPY MOTHERS DAY TO YOU ALL !!!
Until next week,
Kay xx


Friday, April 24, 2020

6 Card Quarantine Kit - 24th April 2020


6 Card Quarantine Kit
Kay Sutcliffe – CTMH
  24th April 2020
Welcome to my 3rd Quarantine Card kit.
Please let me know if there is anything you were having trouble with, or if things are to easy. Trying to keep to each of your skill levels.
I hope you are doing ok in isolation, remember if there is anything you need, don’t hesitate to let me know!


Card 1 – Sending a Smile
This card is so sweet, start by mounting the spotty piece to your card.
Using a black pen, draw little fake style stitches around the side, then take of the tape covers, wrapping the cord around the top before putting it onto of the spotty paper. DON’T FORGET or you will need to peel it back up after. Colour in your little Fox and using the pop dots pop up both the saying and fox in the empty circle spot. Put your bronze purls on last.


Card 2 – Happy birthday monochrome pink
Sweet pink flowery card.  Start by sticking your embossed pink card on your base card first. Layer the pink card strips on the top and bottom of the card then the pink flowered strips on top.
Put the saying on the pink matching card, using pop dots, stick on as per the picture.
To do the flower, I scrunched up the flowers, and carefully opened it back up and making it a bit flatter, stick them together using a glue or tape, and pop on the biggest bling dot.  Pop your flower on and your bling to complete.


Card 3 – Shine your light birthday
This card uses the new Seas the day sets. Brought to use on my cruise pages, but this idea came into my head and just had to make it.
Stick down the brown and stripe ribbon strip first, and layer up from there. You can use my card as the guide and move things about to suit the way you would like it. I put on the dark blue card and of center the saying. Pop dotting the light house where you would like it. And your pretty silver bling last.


Card 4Happy Birthday Flowers
This is a simple layering card. Pop on the blue piece of card, then the Green patterned paper. You have choice here to use the RED side or the Green side… what ever side you choose, make sure your tag piece is using the opposite side.
I have also given you a “Happy birthday” or “A special friend”
colour in how you like, and if you have it, a shimmer pen over the top.
Pop the two hearts down near the saying “the best thing about this card is the person holding it” and the other clear bling up the top.

Remember you can change this up any way you like. 


Card 5 – Dream it and you can do it.
This card is soooo Pretty, took me a while to figure out how to work the beautiful lattice background.
Using a glue, glue the gold lattice piece, now this will be too big at the edges, you will need to trim as needed. Not all pieces cut the same so you can glue onto the card where it looks good for yourself and then trim where it needs to be.
Tape the black rectangle card onto the lattice,  then laying GOLD, BLACK then the GOLD sentiment. Placing this at the bottom of the black card.
Use the pop dots to pop up the flowers and place them where you like on the card.

There is white card inside already stuck down so you can write what you like.


Card 6 – Alice birthday


This one is just precious.  And I’m just a HUGE fan of Alice.
there are two different background papers, as I ran out of one type.
but the assembling is the same.  Put on the purple card onto your base. The square decorated pieces lay with spaces in between.
Colour in your Alice, I used water-colour pencil and lightly coloured with water after. But you can use any colouring you have.  Put Alice onto the circle card, and use pop dots to lay on the card. Lay the birthday tag where ever you like. And add the bow, there is a very sticky dot on the bow, once it is down, it will stay down.  So don’t take the cover off until you know where it is going to go.


Friday, April 17, 2020

6 Card Quarantine Kit - 17th April 2020


6 Card Quarantine Kit

Kay Sutcliffe – CTMH  17th April 2020

Welcome to my 2nd Quarantine Card kit! Below are simple instructions to each card. 

Please let me know if you have to much trouble assembling, or if it was too easy. I can adjust the assembly to suit your skills. (more, less fussy cutting etc).

Enjoy the kit this week, I hope you have as much fun doing them as I had making them!


Card 1

I think this one is my favourite this week. 
Colour in the puppy with what ever you like.
 I used water colour pencils and used a lightly wet brush and just brushed it to blend.
The bow has a sticky dot on it, be careful not to let the backing fall off before your ready, its very sticky and once it is stuck, its STUCK.
I have given you two different sayings to use. A birthday saying or a friend saying.  Choice is yours.
I pop dotted the puppy card and the mounted saying. 


Card 2
This is a special request card, and certainly got my brain thinking as I didn’t have any golfing stamps.
 So using my scan and cut I found the perfect Golf green. 
Move it about to suit yourself.  
The flag and the ball are both popDotted.

(if you do have any requests for a themed card, I love the challenge) 

Its easy to search for files to cut on your cricut or scan and cut. I tend to look for files if I dont have a stamp or a die on hand to use. The golf ball is just a circle I punched out, and put through the big shot and embossed it. 


 Card 3
The super easy one for this week.
Layer the card pieces. 
I have put tape on the back of the burlap strip already for you to peel off. 
Use a glue dot to glue down the bow.
I pop dotted the greeting and  If you use a wet glue, leave to the side for a few hours to dry.
 I used a two step stamping, stamping a solid image and without restamping, I stamped again, giving the look of different colour inks. 


Card 4

Graduation card!

Using your sand paper in your kit from last week, distress the edges of both the stripy large piece, and the darker grey piece. 
(as much or as little as you like)
 stick both those pieces down, and then assemble the other pieces.
I used pop dots on all these. Even the small scroll. Popped everything right out. 
spread out some bling and done.


 Card 5
This card is just a simple layering.
Assemble in this order.
  1. White wood background 
  2. Dotty piece, 
  3. lighthouse piece mounted on the brown, 
  4. pop dot the fence and let it cover the bottom of the lighthouse card.

 Put on your bling.


Card 6

I made this card because my mum loves dragonfly’s.
Assemble in this order.
  1. Grey card
  2. gold glitter strips (I have put on tape already for you, all you need to do is peel),  
  3. using my card as a guide you align them, put tape about 1.5cm in from the edge of the grey stamped piece on the back.. this will ensure it misses the glitter card, as it wont stick to the glitter, 
  4. pop dot the back of the greeting, and the dragonfly.

     Assemble them where ever you like. 


Hope you enjoyed this weeks cards... Next weeks are already in the works, cannot wait to share 
xx Kay

Friday, April 3, 2020

6 Card Quarantine Kit - 3rd April 2020


6 Card Quarantine Kit

Kay Sutcliffe – CTMH

All these cards are ready to assemble (to a degree)!  Below are simple instructions to each card

At times like this, particularly those who are at home on their own, the connection of receiving a physical card is important. 
Any cards you would like to post, I can grab them from you and post for you.  Just message me to let me know.

HAVE FUN, AND I HOPE YOU ENJOY YOUR CRAFTY TIME DURING THIS CRAZY PANDEMIC.


Card 1


A Simple one to start with.
Using your water colour pencils, colour in the bird.
Use a paint brush and a tiny bit of water. (remember that the less wet the brush is the darker the watercolors will be).

Build up the card as per the picture. Using pop dots to pop up the mounted image of the bird. 


 Card 2
Use the spotty side facing up.
Layer this card starting with the pink cardstock.
Don’t forget the pink card strip and green glitter strip before you put on the green cardstock with the stamped image on it. (use the pop dots for the green card)
Scatter about the bling dots.

If you don't have the right coloured cardstock this type of stamping works well... the yellow of the cake is actually stamped.. and the happy birthday is stamped on top. Easy and no needing to fussy-cut pieces too. EASY


Card 3
This one is explanatory.
Layer the strips down the bottom, starting with the glitter tape right at the bottom and work your way up.
Peel the clear backing on glitter tape, it already had adhesive.
Cut out the celebrate flag and use the popdots to pop it on top of the strips.
Love how you don't need to have much materials to make a wonderful card easily!

 Card 4
This one is pretty simple.
Use the feather side facing up.
Build up the card, using flat popdots behind the orange cardstock.
Colour in your stamped flowers using pens/alcohol markers and fussy cut them.
Use the larger pop dots for the flowers.
You don’t need to use the happy birthday; this would suit as a lovely card for a friend in isolation without the happy birthday.


Card 5

Use sand paper square to sand the edges/face of the brown textured paper that is directly onto the card base. 
This gives a distressed lovely look.
Cut out your flower, leaves and the bird.
Construct the card, and use the different size popdots to pop up your cutouts.

Card 6
This is my favourite card of the kit.
On the base card put the orange and flower papers on.
Pop up the teapot onto the bottom of the card, colour and cut out the flower using markers. 
The tea bag icon is already pop dotted ready to take of the adhesive.
The extra for this card is what goes on the inside.Inside there is a piece of orange cardstock that I have already put thin tape on, this is for you to pop the tea bag. There is also an optional printed note. You do not have to use this.
The Orange card is stuck down with PopDots.


Hope you enjoyed this card kit. 
Until next week... 
Kay